
디포라(dfola) 사이트에 사진 올리는 방법 (Here's how to upload photos on Dfola.)
2013.08.08 23:51
디포라(약칭) 사이트에 사진을 올리시는 방법을 알려 드리겠습니다.
(Here's how to upload photos on Dfola.)
우선 사진의 너비를 1500 px 로 앞축하여 주시면 감사하겠습니다.
(First, compress the size of the photo to 1500px.)
그리고 디포라에 로그인을 하십니다. 만약 로그인 후 아직 준회원일경우 정회원 업그레이드 요청을 하십시오.
(Then, sign in. If you are still an associate member, please upgrade to full member.)
사진을 올리시기위해서 우선 사진에 해당되는 게시판으로 가야 합니다. (예. 인물사진, 풍경사진, 꽃 등등)
(Choose the right category for the type of photo you are trying to upload. (ie. Portraits, Landscapes, Flowers, etc...)
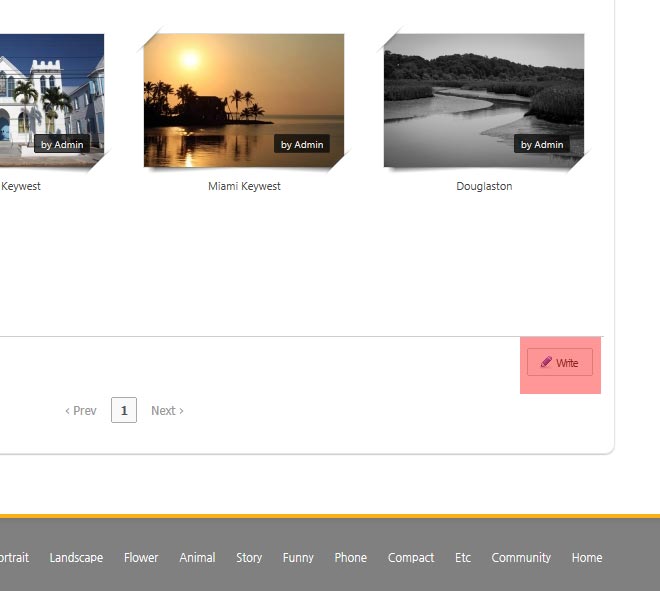
해당게시판의 우측 맨아래로 내려가시면 글쓰기(Write)가 있습니다.
(On the right-hand side of the bulletin you can click on Write to write in a text about your photo.)
글쓰기를 누르시면 글쓰기 모드로 바뀝니다.
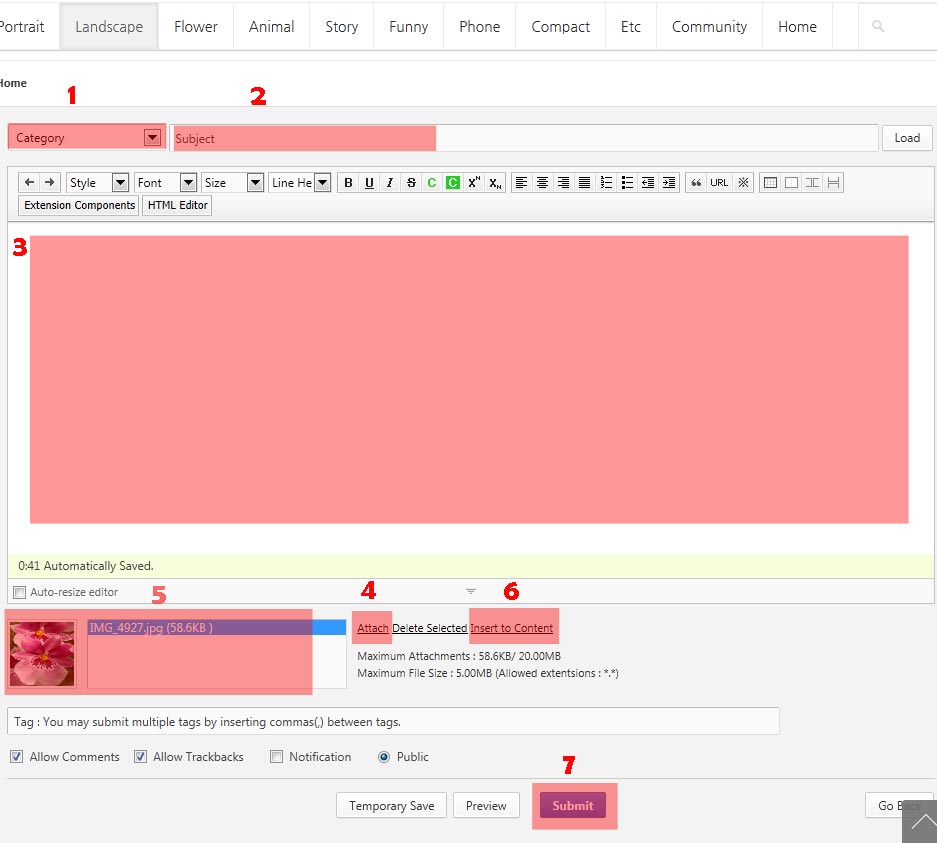
1. 먼저 분류(Category) 를 선택하세요
2. 제목(Subject)를 넣어 주십시오.
3. 본문에 간단히 내용을 적으세요... 처음에 키보드에서 Enter를 3번 정도 쳐주시고 나서 글을 쓰시면 좋습니다.
4. 사진을 올리기 위해서 파일 첨부(Attach)를 누르시면 윈도우(Select files to upload by dphotolife.com)가 나타납니다. 사진이 있는 경로(Directory)로 이동하셔서 사진에 두번 클릭하십니다.
5. 좌측 아래에 사진과 함께 사진의 이름이 나타납니다.
6. 사진의 이름이 파랗게 선택되어 있을 때 우측에 있는 본문삽입(Insert to Content)을 클릭하십니다. 이때 본문에 깜빡이(Insertion Point)가 깜빡이는 곳으로 사진이 들어가게 됩니다. 그러므로 정확히 본문(3)에서 사진이 들어갈 위치에 마우스를 클릭하시기 바랍니다.
7. 본문에 사진이 들어갔으면 이제 맨 아래의 등록(Submit)을 클릭합니다.
(Choose the right category for the type of photo(s) you wish to upload. (ie. Portraits, Landscapes, Flowers, etc...)
글쓰기를 누르시면 글쓰기 모드로 바뀝니다.
1. 먼저 분류(Category) 를 선택하세요
(First click where it says "Category.")
2. 제목(Subject)를 넣어 주십시오.
(Fill out the subject of your photo(s).)
3. 본문에 간단히 내용을 적으세요... 처음에 키보드에서 Enter를 3번 정도 쳐주시고 나서 글을 쓰시면 좋습니다.
(Briefly write about your photo(s)... It is best to press "Enter" 3 times as you begin to write in the text box.)
4. 사진을 올리기 위해서 파일 첨부(Attach)를 누르시면 윈도우(Select files to upload by dphotolife.com)가 나타납니다. 사진이 있는 경로(Directory)로 이동하셔서 사진에 두번 클릭하십니다.
(As you begin to upload your photo(s), click where it says "Attach."A window will pop up saying "Select files to upload by dphotolife.com." Look for the photo(s) in the directory you wish to upload, then double-click.)
5. 좌측 아래에 사진과 함께 사진의 이름이 나타납니다.
(On your left-hand side of the photo, you will see the name of your photo.)
6. 사진의 이름이 파랗게 선택되어 있을 때 우측에 있는 본문삽입(Insert to Content)을 클릭하십니다. 이때 본문에 깜빡이(Insertion Point)가 깜빡이는 곳으로 사진이 들어가게 됩니다. 그러므로 정확히 본문(3)에서 사진이 들어갈 위치에 마우스를 클릭하시기 바랍니다.
(You will highlight the photo by clicking on the name of the photo once. On the right-hand side you will click where it says "Insert to Content." From this point you will see the Insertion Point in the text box as your photo will appear inside it. Try to align your photo(s) as you are inserting into content)
7. 본문에 사진이 들어갔으면 이제 맨 아래의 등록(Submit)을 클릭합니다.
(You will complete this process by clicking on "Submit.")